Saturday, December 31, 2011

DIY 7 Minute Statement Necklace

repurposed jewelry

DIY 7 Minute Statement Necklace. Here is a stunning super quick necklace that will make a statement in 7 minutes!

Bobby pins now come in cool colors like gunmetal, bright gold and copper! All you need is a bunch of bobby pins and a shorter 16"  chain.  My chain is a fine mini ball chain; the regular sized ball chains are a little too thick for the pins to slide through. Either string them like beads or just slip them over the chain; the cool thing is if you don't like how it looks you don't have to restring the whole thing, you can add or take away pins wherever you want and you can change the pattern and colors to suit your mood!


bobby pin necklace, upcycled jewelry

You can also make colorful necklaces by spray painting the bobby pins!

bobby pin necklace, upcycled jewelry

Thursday, December 29, 2011

DIY Quick Easy Wall Art For Bathroom

quick fabric wall art


DIY Quick Easy Wall Art For Bathroom. Here is a quick and simple way to get some wall art up fast!  I like the idea of fabric but in a humid bathroom or kitchen it is not very easy to keep clean so this works great! All you need is a frame and some scrap fabric that is about 1 1/2" bigger on all sides of your frame.  I love this Michael Miller damask.  I  ironed the fabric and just taped it on the back of the cardboard (you may want to add a piece of white paper  underneath if you have a light colored fabric) and slid it back into the frame! Now my husband has a stylish bathroom!


Here is my bathroom wall art:  


Sunday, December 18, 2011

How to Make an Upcycled Plastic Bottle Cap Mosaic

upcycled plastic bottle cap wall art


DIY Upcycled Plastic Bottle Cap Mosaic.  I've seen similar colorful paper coiled art on Pinterest but it seems very time consuming to coil papers so I thought bottle caps would make it an easier project. With the help a a few friends,  I saved up enough caps in just a few months!

Materials : canvas, caps, large bottle of matte Collage Pouge (found in the decoupage section of craft stores), plastic glue ( I just used my E-6000 glue) and acrylic paints.

Tools: X-Acto knife, course sandpaper and an old paint or glue bottle with a pointy tip or you could just use a plastic baggy.


First,  I sanded the top of the lids and roughed them up with an X-Acto knife to help the caps stick to the canvas. Next, I used a generous portion of the Collage Pouge so it oozed out the sides. You may want to put stack of newspapers under the canvas to prop it up so the canvas wont sag under the weight of the caps. I had a large cap from a jug of protein powder that I just glued underneath for support.


I started gluing at the center and worked out. I then filled an old paint bottle that has a pointy tip with the Collage Pouge and squirted the Pouge in all of the spaces to make sure these caps will stay put! (Not sure if this step is totally necessary) You can just fill a plastic baggy with the Pouge and cut a little hole if you don't have a bottle with a pointy tip! If you want to add caps inside of larger caps, use a plastic glue or E-6000.  Finally, I filled some of the caps with acrylic paint, the little bottles of paint from craft stores are the right consistency for this. Then I let dry flat for a few days; and I  now have a colorful, textured piece of upcycled wall art!


DIY bottle cap mosaic

Comments welcome!  Be sure to check out my eco friendly magnets made from bottle caps!


Saturday, December 10, 2011

How to Easily Create Texture in Acrylic Paintings

creating texture in acrylic paintings

How to Easily Create Texture in Acrylic Paintings.
Being a jeweler I am always thinking of textures to add to my paintings for more of a 3-D effect and interest. All you need is a lot of Gesso or an acid free "glue" like Collage Pouge found at craft stores in the decoupage section to glue various things like bubble wrap, string, hole punch paper, plastic bags, fabric, etc.


First, you want to glue your texture with the Collage Pouge or other acid free glue;  some people just use Gesso for this step but glue is much easier for string because you can just dunk the string in the glue.


creating texture in acrylics


Another way (a cheaper alternative to stuff you buy in the art store)  to add texture is to mix some Collage Pouge into some spackle until it is the consistency of frosting, then you can create an endless amount of textures with your hands, fork, stamps etc. Let this dry then add at least a couple coats of Gesso; letting it dry between coats.


Then you can add color! I chose a medium tone for this. After this is dry,  I did a wash of a darker blue and dabbed off the excess color to give more depth. After this was dry,  I used my finger to highlight areas with a lighter shade and then last,  I used a silver metallic powder for even more highlights.


For more tips and ideas for texture check out this website AristTerms.com http://www.artistterms.com/texturegallery.htm

Monday, December 5, 2011

DIY Simple Textured Wall Art with String!

string art


DIY Simple Textured Wall Art with String!  


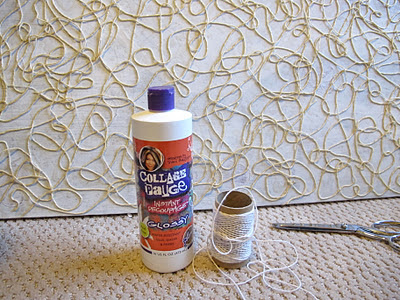
 This is a simple project, easy enough for kids.  All you need is a canvas, string, some sort of acid free glue, ( I used Collage Pauge decoupage glue I got at Joann's) Gesso and acrylic paint. Tools: large paint brush & scissors.


creating textured wall art


I  first thinned the Collage Pauge with a little water  in a container to make it drippy enough so it would run off the string, then dunked about a yard of string at a time into the Pauge, squished out the excess and then added the string to my canvas. Oh yes, it is good to wear some rubber gloves because this stuff is hard to get off of the hands!


When dry add 1-2 coats of Gesso. Let this dry.


 Then add color!

DIY textured wall art

easy wall art

                    Simple wall art to brighten our dark corner of our new townhouse

Like this idea? Comments welcomed!

Sunday, November 13, 2011

Under the Sea; Ocean Themed Christmas Tree

   I always wanted a tree with fish on it but I was busy collecting ornaments from around the world including some really awesome Day of the Dead ornaments...and getting weird looks from family and friends!  Then I got married  and my husband wanted more traditional ornaments so I started collecting glass ornaments of all kinds.  Finally a few days after Christmas one year, I bought a fish ornament!  I  made some sea anemones and urchins and found more fish and so on…


My first ocean themed ornament I made was a super simple jelly fish  (right) made with cheap clear glass bulbs and hot glued iridescent ribbon. The "leg" ribbons have wire in them to shape. I made sea urchins with some ugly glass bulbs I had and glued some organic looking beads then spray painted them gold. (left)


Sorry, these starfish are real and I sprayed them with gold paint and sprinkled with glitter. You could easily make some out of fimo!


These sparkly sea urchins were a messy project! Start with some small styrofoam balls, glue craft sticks and toothpick spikes, let dry then spray silver and glue on the glitter.  Make more than you think you need because every year some of the spines break off!


This colorful anemone was made from yarn; I looped some yarn together  like a bow then hot glued "legs"


The scallop was just enhanced with colored pens and glitter! I also painted sand dollars silver and other shells gold and collected beautiful glass ornaments. My husband still wants a more traditional  tree and I agree, I want two trees this year,  I have so many new ideas!


Sunday, November 6, 2011

DIY Thanksgiving Ideas, Recipes & Decor


I love these tea lights placed inside gourds from Family Circle
I am so focused on the food I often forget about nice simple little festive touches like this.


Brussels sprouts are my favorite. Most everyone actually eats the sprouts when I make them! The secret is roasting and the maple syrup!  Try roasting parsnips and carrots with them : ) Here is the recipe and others from The New York Times


scalloped sweet potatoes
Maple Sage Scalloped Sweet Potatoes


This is another favorite Thanksgiving dish; Scalloped Sweet Potatoes with Maple and Sage. The recipe from Kathy Casey in the Seattle Times. I like to throw pecans on top too! For a "lighter" version you can substitute chicken stock for some of the cream with a couple tablespoon of flour and it is just as yummy


thanksgiving  apron
Thanksgiving aprons from Sew What Designs on Etsy


For a festive look while you are cooking you may want one of these aprons from Sew What Designs on Etsy.


These shimmery pumpkins would be smashing on a more formal table! How-to at favecrafts.com


Here is a gorgeous centerpiece from wedding-ideas-guide.com There will be no room on my table for this but it would look great on the side table!


Last but not least the dessert! I love pumpkin tiramisu. I use a traditional recipe with espresso and all but add a small can of pumpkin puree to the mascarpone with pumpkin pie spice ( about 1/2 tsp)   I also add  1/3c each toasted hazelnuts or pecans, chopped candied ginger and dried cranberries.  I make sure to be generous with the shaved chocolate! Here is a recipe from Better Homes and Gardens  plus a bunch more yummy pumpkin recipes!