Showing posts with label crafts. Show all posts

Friday, February 22, 2013

Victorian Dollhouse Miniatures, Part One


via GIPHY


Victorian Dollhouse Miniatures. This was my first and only 1:12 scale dollhouse I made many years ago from a Greenleaf kit. It took me some time to build, then it sat for a year before I painted it, then it sat for another year before I wired and furnished it!  Right now the furniture is still in boxes after moving,  I think it has been about four years! That is Tuffy our Russian Blue cat who passed just a couple months ago, she was 19 1/2 years old. I was amazed how she could get inside the living room and barely tip anything over!


Beacon Hill dollhouse


Victorian dollhouse

In the next coming posts I will show you the interior plus some of the room boxes and gardens I have done so stay tuned!

Saturday, June 9, 2012

DIY Flower Burst Paper Straw Wreath

DIY straw wreath


DIY Paper Straw Wreath.  I first saw this gorgeous red and white candy stick like Christmas wreath  (click here for detailed instructions) on Pinterest but I never got around to getting the paper straws.  Finally, I found some yellow straws (you need the 144 or 150 pack!) from Making Memories Fun on Etsy and made my version; a bright yellow flower burst! Perfect for brightening up my boring front porch!


paper straw wreath


I first cut a  6" circle out of 2 layers of cardboard and then cut about a 2" hole; I  hot glued these together and sealed them with a clear acrylic spray since I planned to hang it outside. Note: I sandwiched a wire  between the pieces of cardboard for hanging.


I then hot glued 4 full sized straws in a cross then kept adding them evenly around. I then added some shorter straws. By pinching the ends, you can jam the straws around the circle until no cardboard shows. I added a little touch of spray paint and sealed the entire wreath on both sides with clear acrylic spray.


DIY paper straw wreath
                

     These would be gorgeous for a party or wall art too!

I ♥ Handmade

handmade, crafts , art


I  ♥  Handmade! What  creative things are you making with your hands?  Please feel free to share & post your link to your project and pass my artwork along!


Friday, June 1, 2012

A Great Art Quote...

art quote


               This is one of my favorite art quotes! Feel free to pass my artwork along!
                                       If you have a favorite quote, please share it here: )


Sunday, April 22, 2012

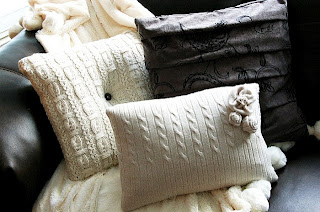
DIY Sweater Pillow Tutorials

DIY Sweater Pillows. Check out the links to the tutorials below!


sweater pillow tutorial

DIY sweater pillows

Make your own comfy colorful pillows out of old sweaters. I love the textures and colors you can get from using old sweaters. The green and orange pillows were made from thrift store sweaters.


My mom made this red pillow for me years ago; I like the swirl she sewed in.


sweater pillows

Some others I made;  I used the arm for my memory foam  "peanut" neck pillow and just tied a knot.


Not even a sweater but my ruched silk top upcycled into decorative pillow for our bedroom! I can't wait to get a hold of some ruffled tops!


DIY sweater pillow

Here is a tutorial for beautiful embellished sweater pillows from the
Brassy Apple


       For a lined sweater pillow here is a great tutorial from make it and love it


My tips:

1) Even if your sweater is a tight weave the white pillow cover may show through so make a darker cover out of some scrap fabric.

2) Remember it will stretch so don't be afraid of it being too small!

3) Have a small sweater and want two pillows? Just use some scrap fabric for the back panels; I used some darker green flannel for the green pillows above.

4) I rounded the tips of my pillow; it helps it look more finished and neater.

Sweater pillows are super easy and fun to make! Feel free to post links to your sweater projects here!

Saturday, April 14, 2012

DIY Scrap Fabric Bow Pasta Tutorial


DIY scrap fabric bow pasta tutorial


 This would be a fun thing for kids but I have none so I made them to add color to my new kitchen!  I saw a few tutorials, including this cool fabric bow pasta tutorial at V and Co. and decided to use Stitch Witchery fusible bonding instead of sewing because I hate to sew!


First, cut  5" squares out of  scrap fabric ( you need two squares of each color for front and back)  Then  cut  5" squares of the Stitch Witchery and sandwich it between the two fabric squares and iron to fuse them together. 
(use package instructions)


Next,  cut the squares in half with regular scissors and then cut in half again with pinking sheers ( you now should have four 2 1/2" squares) and trim one edge with the pinking sheers so opposite sides have the zig zags.


Last, you just sew down the middle;  pull the thread so the fabric crimps and tie a knot and you have a pasta bow!


Thursday, April 5, 2012

DIY Decorative Upcycled Garden Stakes

upcycled garden stakes


DIY Decorative Upcycled Garden Stakes. Make your own fun & funky decorative garden stakes with cheap vases, teapots, plates, do-dads and other junky finds! First you need a long skinny vase that will fit over a garden stake; this one is a cheap florist vase.

For the glue  I used Amazing Goop - Household but I have read GE Silicone II for Windows and Doors works well too.


As you can see I propped my vase upside down with some paper stuffed inside a jar. Use lots of glue; make sure all holes are filled so water can't get inside; let dry 48 hours before putting outside in the rain. I turned my plates and teapot upside down so water couldn't collect or get inside.  I want to be able to leave these outside in our mild Seattle climate year round and not have the water freeze and crack everything in the winter! For the stakes you can use old broomsticks or go to the plumbing department  and get 12' of 1/2" plastic tubing for $2 and spray paint it.


Right now I have these scattered all over my tiny yard but I think they would look best in groups. I love how they add color to my shady garden! These upcycled garden stakes are so easy and fun to make.  For another garden project,  I am collecting colorful plates to make "flower plates" to hang on my fence.

Feel free to post links to your projects; I would love to see them! 


Sunday, February 19, 2012

DIY Easy Hand Painted Vases

easy hand painted vases, upcycled vases


I discovered this crafty blog,  Little Gray Fox, on Pinterest and saw these super cute vases and wanted to try this myself!


DIY easy hand painted vases


               I had these cheap florist vases and I got three bottles of acrylic craft paint


I just squirted the contents of two bottles of craft paint into my smaller vase and slowly and patiently swirled the thick paint around until everything was covered. You can help it along with a paint brush; I just used my fingers. Then I drained it into my larger vase; set it upside down for a few minutes and then wiped off the rim and set it upright to dry. I then squirted the last bottle into my big vase and repeated the process; draining it upside down on paper towels.


hand painted vases, home decor
                                 
                                             Now I have some gorgeous vases !


Note: these are decorative vases; do not put water in them!  For a dishwasher safe version of this project see this great tutorial on this fun blog,  Sugar and Charm


Feel free to post links to your vase projects below; I would love to see them!

Saturday, December 31, 2011

DIY 7 Minute Statement Necklace

repurposed jewelry

DIY 7 Minute Statement Necklace. Here is a stunning super quick necklace that will make a statement in 7 minutes!

Bobby pins now come in cool colors like gunmetal, bright gold and copper! All you need is a bunch of bobby pins and a shorter 16"  chain.  My chain is a fine mini ball chain; the regular sized ball chains are a little too thick for the pins to slide through. Either string them like beads or just slip them over the chain; the cool thing is if you don't like how it looks you don't have to restring the whole thing, you can add or take away pins wherever you want and you can change the pattern and colors to suit your mood!


bobby pin necklace, upcycled jewelry

You can also make colorful necklaces by spray painting the bobby pins!

bobby pin necklace, upcycled jewelry

Sunday, November 13, 2011

Under the Sea; Ocean Themed Christmas Tree

   I always wanted a tree with fish on it but I was busy collecting ornaments from around the world including some really awesome Day of the Dead ornaments...and getting weird looks from family and friends!  Then I got married  and my husband wanted more traditional ornaments so I started collecting glass ornaments of all kinds.  Finally a few days after Christmas one year, I bought a fish ornament!  I  made some sea anemones and urchins and found more fish and so on…


My first ocean themed ornament I made was a super simple jelly fish  (right) made with cheap clear glass bulbs and hot glued iridescent ribbon. The "leg" ribbons have wire in them to shape. I made sea urchins with some ugly glass bulbs I had and glued some organic looking beads then spray painted them gold. (left)


Sorry, these starfish are real and I sprayed them with gold paint and sprinkled with glitter. You could easily make some out of fimo!


These sparkly sea urchins were a messy project! Start with some small styrofoam balls, glue craft sticks and toothpick spikes, let dry then spray silver and glue on the glitter.  Make more than you think you need because every year some of the spines break off!


This colorful anemone was made from yarn; I looped some yarn together  like a bow then hot glued "legs"


The scallop was just enhanced with colored pens and glitter! I also painted sand dollars silver and other shells gold and collected beautiful glass ornaments. My husband still wants a more traditional  tree and I agree, I want two trees this year,  I have so many new ideas!


Saturday, May 21, 2011

DIY Long "Patchwork" Chain Necklace Tutorial for Beginners


Here is a simple necklace even a beginner can make using bits of old chain and beads. These look great alone or layered with your favorite necklaces. The idea here is to keep it simple so it has a random whimsical feel. You can add fancy twisted jump rings or hammered loops, charms or whatever you have on hand; I like the look of using bigger jump rings for a more modern,  fun  look.

Tools needed: round nose pliers, wire cutters; You can get both for about $10 at Fire Mountain Gems.

Materials: bits of old chain, assorted beads, 4mm 20 gauge and 8mm 18 gauge jump rings (I used about 8 each per necklace), eye pins, optional clasp. If you already have tools and just need a few jump rings I recommend   Fusion Beads (free shipping!)

Monday, December 20, 2010

How to Sew a Fabric Bowl - CraftStylish

These coiled fabric bowls are addicting to make. Use up all of your old fabric scraps and twist them around a cotton clothesline and zigzag! They are so simple to make! These look great hanging on my wall.

Follow this link  for complete instructions from CraftStylish:
How to Sew a Fabric Bowl - CraftStylish

Sunday, December 12, 2010