Showing posts with label upcycling. Show all posts

Sunday, December 7, 2014

DIY Upcycled Photo Christmas Ornaments

DIY photo ornaments


DIY   Christmas Ornaments, holiday crafts made from upcycled jar lids, scrap ribbon and mini metallic Christmas trim with photos of friends and family. You can also find cool free vintage prints online to download or  recycle old Christmas cards!  I especially like the gingham lids from jam. 

Materials:
jar lids
hot glue 
Mod Podge
glitter or fairy dust
various trims, ribbon and cords
bells or something fun to dangle
tiny ornaments
photos or prints

Tools:
glue gun 
drill
scissors

1) Figure out the diameter you want for the photos using a photo editing program ( I used Mac Pages) I made extra in slightly different sizes just in case they didn't work. Leave enough space for any trim (about 1/4" ) print  and cut out the photo so they are circular and will fit in the lids.

2) Drill holes in lids; one on the top and one on the bottom; thread the cord you are going to use to hang them ( I like the stretchy gold ) add the bell then tie an knot on the inside of the lid and hot glue it. Do the same with the hanger, I tie a knot on the outside too.

3) Using Mod Podge, paint the lid on one side and a trick is to let the Mod Podge slightly dry by blowing on it for a minute or two then place your photo on it....this should keep the paper from crinkling and keep it nice and  smooth. Repeat on the other side and do all your other ornaments. I let mine dry about 1/2 hour before putting a coat of Mod Podge over and dusting with glitter or fairy dust.

4) When dry,  you can add the trim, hot gluing it in place and adding other ornaments like a bow.


Here is one I did for Abby,  from the The Vintage Inspired Passionista Blog made from the last pickle jar lid in my house:


Vintage Inspired Passionista


jar lid ornaments
Upcycled ornaments with free vintage printables on the backs


upcycled ornaments


Christmas ornament DIY


These look even better on a tree! Next year maybe I can save enough lids for my own tree!

Do you like upcycling Christmas ornaments, what do you make for Christmas? Comments welcomed!

Saturday, January 18, 2014

DIY Recycled Plastic Bottle Crafts, Kid's Crafts

DIY Christmas ornaments


Make flowers or sea creatures out of plastic bottles! Use them to decorate; make a mobile, chandelier or hanging curtain. I made sea anemone ornaments for my ocean themed Christmas tree! You can use them for "bows" on a pretty gift packages or even make jewelry! A fun craft project for kids with adult supervision and maybe a little help.

*** I guess in today's age we must also include basic common sense warnings like open a window,  use a fan, have a bowl of water in case things get hot and candles cause fire! If you are afraid of the chemicals you probably shouldn't have the plastic bottles in the first place! You probably shouldn't have Sharpies or glue either! Sorry, this is for the alarmists out there!


Tools and materials:

clear or colored plastic bottles
buttons, beads, bottle caps
scissors
Sharpies
paper punch
candle
string to hang them with
E6000 glue


First,  cut the bottom out of the bottle; I use a serrated kitchen knife but scissors work just as well. Trim the bottom part so it look more like a flower then with a good metal paper punch (the cheap plastic ones may beak!) punch a hole out for hanging:


plastic bottle crafts


With Sharpies, draw your patterns, this is where the kid's can have fun:

kid's crafts


Then carefully melt over a flame, about 1 1/2" over the flame
works well: 

plastic bottle flower


recycled crafts


recycled plastic


They look great like this or kids can glue in a colorful  bottle caps, buttons and beads but first add the cord with a slip knot:


DIY  ornaments


 You can make stamens  by cutting a strip of plastic about 6" long by  1.5 to 2" wide: 


DIY crafts


Carefully melt the tips first; try to get them to curl out in one direction. This can be tricky!  You can also make individual ones then glue them with blob of glue in the center of the flower.


recycling plastic crafts


With the stamens pointing outward, start coiling and melting:


plastic bottle flower


Hopefully, it will look like this:

recycled bottle crafts


You can then glue it directly to your flower or I glue it to a bottle cap then the flower:


plastic bottle ornaments


recycled plastic ornaments


These are my recycled plastic ecochic necklaces on Etsy that are made the same way:


ecochic necklace


recycled plastic necklace


Here are more inspirational ideas from Michelle Brand who is an environmental designer   internationally known for her designs with plastic bottles:


Michelle Brand


See my other popular upcycling blog posts:

"DIY Dollhouse Miniatures: Modern "Glass" Art Tutorial" for Chuhuly style miniatures made out of recycled plastic containers:


See how to make my  bottle cap art mosaic:


bottle cap art


I would love to see how you recycle or upcycle, feel free to post a link to your project, website, blog, or page! 


Friday, March 22, 2013

Upcycled Wall Art Project

CD wall art


Here is my upcycled CD wall art project. I made this to brighten up our dark office. It certainly does that but would even be more effective with a couple more panels!  I started with a 15x30" canvas and painted it  lime green.  I had a container of Weldbond glue and applied it on thick:

DIY wall art


CD art
CD wall art before dusting!


upcycled art

I let the glue dry a couple days before hanging. Here it is in the corner opposite the window. What do you think... maybe a couple more panels, one violet and one turquoise or keep it all green? This could look fun in an entertainment or music room too!

Saturday, December 15, 2012

Recycle, Reuse, Remake, Repurpose... Upcycle!

upcycled wall art
The original upcycled bottle cap mosaic

A repurposed blog post about upcycling upcycled art!  I just had some fun with photos of my upcycled bottle cap mosaic. See directions on my original post about  bottle cap art to make one of these yourself!


I took a bunch of photos and got this blurred one that is perfect for the background on my Tumblr blog! I am lucky I have a mac and just used iphoto to increase the saturation and reduce the noise to get an interesting effect.

repurposed art


The cool thing about 3-d art  you can take pictures at different angles that can be reused for various things or you can just frame it and hang it!

upcycling bottle caps


This one I used Gimp, a free photo editing program similar to photoshop, to posterize and play with the hues.  I really like how it looks but I am not sure where I'm going to use it yet!

recycled-wall-art

So, whether it is a blog post, art or photo it is okay to upcycle or repurpose! How do you reuse or repurpose? Please share you ideas here!


Thursday, April 5, 2012

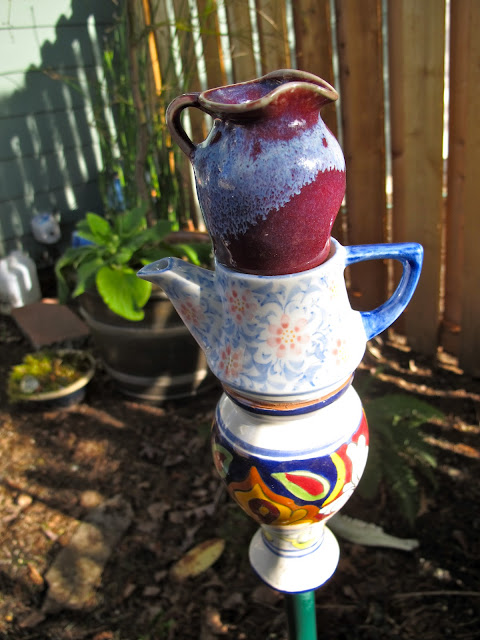
DIY Decorative Upcycled Garden Stakes

upcycled garden stakes


DIY Decorative Upcycled Garden Stakes. Make your own fun & funky decorative garden stakes with cheap vases, teapots, plates, do-dads and other junky finds! First you need a long skinny vase that will fit over a garden stake; this one is a cheap florist vase.

For the glue  I used Amazing Goop - Household but I have read GE Silicone II for Windows and Doors works well too.


As you can see I propped my vase upside down with some paper stuffed inside a jar. Use lots of glue; make sure all holes are filled so water can't get inside; let dry 48 hours before putting outside in the rain. I turned my plates and teapot upside down so water couldn't collect or get inside.  I want to be able to leave these outside in our mild Seattle climate year round and not have the water freeze and crack everything in the winter! For the stakes you can use old broomsticks or go to the plumbing department  and get 12' of 1/2" plastic tubing for $2 and spray paint it.


Right now I have these scattered all over my tiny yard but I think they would look best in groups. I love how they add color to my shady garden! These upcycled garden stakes are so easy and fun to make.  For another garden project,  I am collecting colorful plates to make "flower plates" to hang on my fence.

Feel free to post links to your projects; I would love to see them! 


Saturday, February 18, 2012

5 Awesome Examples of Upcycling

According to Wikipedia, Upcycling is the process of converting waste materials or useless products into new materials or products of better quality or a higher environmental value.

        Here are five example of awesome upcycling or repurposing materials into colorful art:


            Gorgeous hanging lamp made from plastic bottles by THISgallery on Etsy.


Repurposed clothespins made into cool wall art  found one the best blogs for upcycling:  The Blue Velvet Chair


                      Repurposed shoe sculptures by Gwen Murphy found on Artstormer


upcycled jewelry, repurposed bobby pin necklace


Upcycled  unique necklaces made from bobby pins by BluKatDesign on Etsy.


Upcycled plastic bottle cap wall art.  How to make your own here: DIY Plastic Bottle Cap Mossaic


.

Saturday, December 31, 2011

DIY 7 Minute Statement Necklace

repurposed jewelry

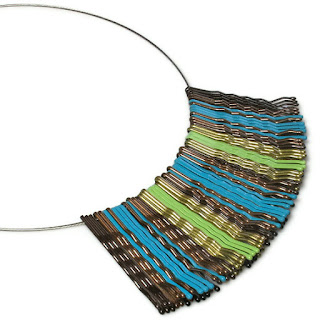
DIY 7 Minute Statement Necklace. Here is a stunning super quick necklace that will make a statement in 7 minutes!

Bobby pins now come in cool colors like gunmetal, bright gold and copper! All you need is a bunch of bobby pins and a shorter 16"  chain.  My chain is a fine mini ball chain; the regular sized ball chains are a little too thick for the pins to slide through. Either string them like beads or just slip them over the chain; the cool thing is if you don't like how it looks you don't have to restring the whole thing, you can add or take away pins wherever you want and you can change the pattern and colors to suit your mood!


bobby pin necklace, upcycled jewelry

You can also make colorful necklaces by spray painting the bobby pins!

bobby pin necklace, upcycled jewelry

Sunday, December 18, 2011

How to Make an Upcycled Plastic Bottle Cap Mosaic

upcycled plastic bottle cap wall art


DIY Upcycled Plastic Bottle Cap Mosaic.  I've seen similar colorful paper coiled art on Pinterest but it seems very time consuming to coil papers so I thought bottle caps would make it an easier project. With the help a a few friends,  I saved up enough caps in just a few months!

Materials : canvas, caps, large bottle of matte Collage Pouge (found in the decoupage section of craft stores), plastic glue ( I just used my E-6000 glue) and acrylic paints.

Tools: X-Acto knife, course sandpaper and an old paint or glue bottle with a pointy tip or you could just use a plastic baggy.


First,  I sanded the top of the lids and roughed them up with an X-Acto knife to help the caps stick to the canvas. Next, I used a generous portion of the Collage Pouge so it oozed out the sides. You may want to put stack of newspapers under the canvas to prop it up so the canvas wont sag under the weight of the caps. I had a large cap from a jug of protein powder that I just glued underneath for support.


I started gluing at the center and worked out. I then filled an old paint bottle that has a pointy tip with the Collage Pouge and squirted the Pouge in all of the spaces to make sure these caps will stay put! (Not sure if this step is totally necessary) You can just fill a plastic baggy with the Pouge and cut a little hole if you don't have a bottle with a pointy tip! If you want to add caps inside of larger caps, use a plastic glue or E-6000.  Finally, I filled some of the caps with acrylic paint, the little bottles of paint from craft stores are the right consistency for this. Then I let dry flat for a few days; and I  now have a colorful, textured piece of upcycled wall art!


DIY bottle cap mosaic

Comments welcome!  Be sure to check out my eco friendly magnets made from bottle caps!