Sunday, April 22, 2012

DIY Sweater Pillow Tutorials

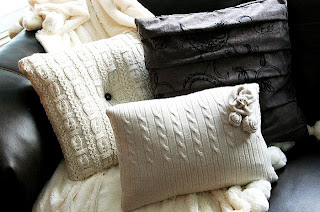
DIY Sweater Pillows. Check out the links to the tutorials below!


sweater pillow tutorial

DIY sweater pillows

Make your own comfy colorful pillows out of old sweaters. I love the textures and colors you can get from using old sweaters. The green and orange pillows were made from thrift store sweaters.


My mom made this red pillow for me years ago; I like the swirl she sewed in.


sweater pillows

Some others I made;  I used the arm for my memory foam  "peanut" neck pillow and just tied a knot.


Not even a sweater but my ruched silk top upcycled into decorative pillow for our bedroom! I can't wait to get a hold of some ruffled tops!

DIY sweater pillow

Here is a tutorial for beautiful embellished sweater pillows from the
Brassy Apple


       For a lined sweater pillow here is a great tutorial from make it and love it


My tips:

1) Even if your sweater is a tight weave the white pillow cover may show through so make a darker cover out of some scrap fabric.

2) Remember it will stretch so don't be afraid of it being too small!

3) Have a small sweater and want two pillows? Just use some scrap fabric for the back panels; I used some darker green flannel for the green pillows above.

4) I rounded the tips of my pillow; it helps it look more finished and neater.

Sweater pillows are super easy and fun to make! Feel free to post links to your sweater projects here!

Saturday, April 14, 2012

DIY Scrap Fabric Bow Pasta Tutorial


DIY scrap fabric bow pasta tutorial


 This would be a fun thing for kids but I have none so I made them to add color to my new kitchen!  I saw a few tutorials, including this cool fabric bow pasta tutorial at V and Co. and decided to use Stitch Witchery fusible bonding instead of sewing because I hate to sew!


First, cut  5" squares out of  scrap fabric ( you need two squares of each color for front and back)  Then  cut  5" squares of the Stitch Witchery and sandwich it between the two fabric squares and iron to fuse them together. 
(use package instructions)


Next,  cut the squares in half with regular scissors and then cut in half again with pinking sheers ( you now should have four 2 1/2" squares) and trim one edge with the pinking sheers so opposite sides have the zig zags.


Last, you just sew down the middle;  pull the thread so the fabric crimps and tie a knot and you have a pasta bow!


Thursday, April 5, 2012

DIY Decorative Upcycled Garden Stakes

upcycled garden stakes


DIY Decorative Upcycled Garden Stakes. Make your own fun & funky decorative garden stakes with cheap vases, teapots, plates, do-dads and other junky finds! First you need a long skinny vase that will fit over a garden stake; this one is a cheap florist vase.

For the glue  I used Amazing Goop - Household but I have read GE Silicone II for Windows and Doors works well too.


As you can see I propped my vase upside down with some paper stuffed inside a jar. Use lots of glue; make sure all holes are filled so water can't get inside; let dry 48 hours before putting outside in the rain. I turned my plates and teapot upside down so water couldn't collect or get inside.  I want to be able to leave these outside in our mild Seattle climate year round and not have the water freeze and crack everything in the winter! For the stakes you can use old broomsticks or go to the plumbing department  and get 12' of 1/2" plastic tubing for $2 and spray paint it.


Right now I have these scattered all over my tiny yard but I think they would look best in groups. I love how they add color to my shady garden! These upcycled garden stakes are so easy and fun to make.  For another garden project,  I am collecting colorful plates to make "flower plates" to hang on my fence.

Feel free to post links to your projects; I would love to see them! 


Thursday, March 15, 2012

Easy DIY Scrap Fabric & Ribbon Wreath

scrap fabric wreath

Easy DIY  fabric wreath. Make your own simple scrap fabric and ribbon wreath!  I started with a pressed straw wreath form; these are almost half the price of the foam forms at craft stores. You can also get a 6' foam tube for .97 in the plumbing department at Home Depot!  Thanks to the blog,  The Penny Parlor for the great tip!

DIY scrap fabric wreath

I  hot glued strips of fabric to the back if the form. Then I glued ribbon, yarn, lace and added some vintage brooches and earrings. Now, I have a fun, colorful handmade wreath for my craft room!


Friday, February 24, 2012

DIY Upcycle Old Junky Finds Into Something New


DIY Upcycle Old Junky Finds Into Something New! You can transform anything with a little spray paint!  I found these brass candlestick holders and lamp base at a thrift shop and did a good scrubbing with dish soap. For the paint,  I prefer Valspar because it covers really nice, dries super fast and seems to work in colder, more humid places like Seattle!  I found the most variety of colors at our local Fred Meyer supermarket rather than at the home improvement stores.


The rim of this candle holder was chipped so I glued a lid from a jar with my E-6000 glue.  I sprayed everything with a coat of primer and let it dry.


upcycled candle holders

I added several coats of the turquoise and now I have something fresh and new!  The tray was an old black Pottery Barn wood tray I already had and wasn't using. Super simple DIY project.

Feel free to post links to your spray paint make-over projects!

Sunday, February 19, 2012

DIY Easy Hand Painted Vases

easy hand painted vases, upcycled vases


I discovered this crafty blog,  Little Gray Fox, on Pinterest and saw these super cute vases and wanted to try this myself!


DIY easy hand painted vases


               I had these cheap florist vases and I got three bottles of acrylic craft paint


I just squirted the contents of two bottles of craft paint into my smaller vase and slowly and patiently swirled the thick paint around until everything was covered. You can help it along with a paint brush; I just used my fingers. Then I drained it into my larger vase; set it upside down for a few minutes and then wiped off the rim and set it upright to dry. I then squirted the last bottle into my big vase and repeated the process; draining it upside down on paper towels.


hand painted vases, home decor
                                 
                                             Now I have some gorgeous vases !


Note: these are decorative vases; do not put water in them!  For a dishwasher safe version of this project see this great tutorial on this fun blog,  Sugar and Charm


Feel free to post links to your vase projects below; I would love to see them!