Friday, September 28, 2012

Bead Storage - Craft Room Ideas

bead storage ideas


I am still drooling over this bead storage from Sew Many Ways Blog; check out the most awesome craft room!  I am hoping to get my new craft room more organized. I started with my own version of this magnetic board for beads; I just got a simple cheap ready made board. Little condiment containers that have magnets glued on the back are so handy!   

magnetic bead board
My magnetic bead storage board; I keep a lot of my findings handy here.


bead storage
Old spice jars are used for my more colorful beads.


bead storage
On my bench I have an assortment of crystal and glass dishes and bowls I got super cheap at the Goodwill.


fabric covered magnetic board
This is a fabric covered board from My Girlish Whims Blog.


hanging  magnetic bead storage
Here is a hanging magnetic bead storage/spice rack tutorial I did a while back.


magnetic bead board
Super cool "Elvis" magnetic bead board from The Ornament Girl's Blog.  Maybe eventually I will replace my plastic containers with these nice metal ones!


bead storage

I am going to keep my eye out for something like this from Perpetualplum's Blog on my next trip to the Goodwill!

This corner of my craft room is a little more organized now!


The closet is next!

If you have unique ways of storing beads or just want to share your organized craft room feel free to post your link here!


Thursday, September 27, 2012

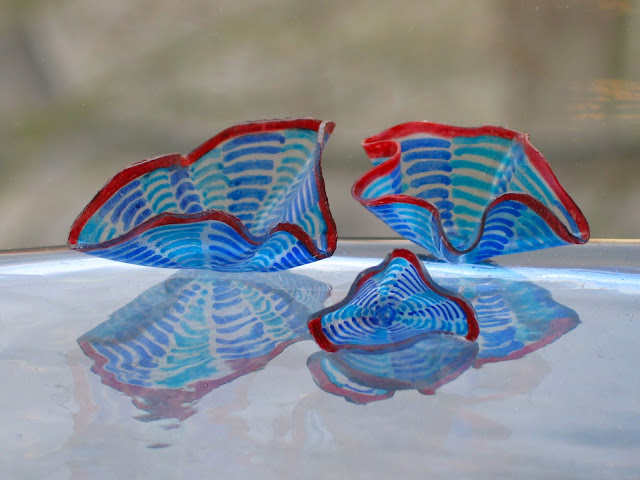
DIY Dollhouse Miniatures: Modern "Glass" Art Tutorial


dollhouse miniature modern art
1:12 scale miniature "glass" art made with plastic and glass seed beads

DIY Dollhouse Miniatures: Modern  "Glass" Art Tutorial

I am designing a modern dollhouse loft.... or now maybe some miniature shipping container pods... I have been wanting to do some modern minis for years!  I started with some of the accessories and furniture first;  that was years ago and I haven't done any miniature work since! These "glass" bowls are perfect for a modern dollhouse, plus they are fun to make!

 I love the look of Dale Chihuly style glass art along with pottery, sculptures and my modern paintings. Someday I will build a lighted glass shelving unit to display my miniature "glass"art. 


Materials and  tools needed:

Plastic produce containers like those rectangular ones for herbs or spinach
Colored Sharpies
Foil
Scissors
Seed beads
Krylon clear acrylic spray
Super glue
Tacky glue
Toothpick


dollhouse miniature modern tutorial

Step one: Cut out ovals or circles of various sizes from plastic produce containers. Using permanent markers draw circular patterns. You can smear patterns with a toothpick or blot with a paper towel; be creative. Note the plastic will shrink a bit.

Step two: Place one piece on crinkled foil (the crinkles make it easier to pick up the plastic) and place in preheated  275F oven  for 45 seconds to one minute.


dollhouse miniature modern art


 Step three: Quickly remove from oven and shape with fingers by cupping the plastic in the foil ( it will be cool enough).  If it hardens before you get the desired shape, place back in oven with foil pinched around to hold its shape for about 30 more seconds. You can rework the plastic for a total of  about 3 minutes before the plastic will start turning white which creates interesting effects.


Step Four:  Touch up with markers if necessary and spray with Krylon Acrylic Gloss. Super glue any pieces together and glue glass seed beads inside using tacky glue.


DIY dollhouse modern art


My other minis: 1:12 scale Antique Shop 1:12 scale Dollhouse Tea Shop 1:12 scale miniature clock and jewelry shop 1:12 scale Conservatory 1:12 scale Victorian Dollhouse Living Room
Dollhouse Bedrooms 

Do you love miniatures or have you tried this tutorial? Comments welcomed!

Saturday, September 15, 2012

Fall Treat - Pumpkin Chip Cookies

Fall Treat - Pumpkin Chip Cookies
A healthier chocolate chip cookie!

pumpkin chip cookies


        A versatile pumpkin cookie recipe that stays moist and tastes even better the next day! You can replace the chocolate chips with carob chips; use whatever combination of nuts, seed and dried fruit you like. 

Ingredients
1 15 oz can pumpkin
2/3 cup brown sugar
1/2 cup vegetable oil
1 egg
1 cup all-purpose flour
1 cup oats
1 tsp vanilla extract
1 1/2 teaspoon baking soda
1 teaspoons baking powder
2 teaspoons ground cinnamon
1 teaspoon ground ginger
1/2 teaspoon salt
1 cup semisweet chocolate chips
1 cup vanilla chips
2/3 cup chopped walnuts
1/3 cup pumpkin seeds
1/3 cup raisins
1/3 cup coconut
1/3 cup dried cranberries


pumpkin cookie recipe
The dough will look kind of like this. That's Zoe watching!


Directions
Combine pumpkin, sugar, vegetable oil, egg and vanilla. In a separate bowl, stir together flour, baking powder, baking soda, ground cinnamon, ginger and salt.  Add flour mixture to pumpkin mixture and mix well. Add  oatmeal, chips, pumpkin seeds, cranberries, raisins, coconut and nuts.
Drop by spoonful on greased cookie sheet and bake at 375 degrees F  for approximately 12 minutes or until lightly brown and firm. I make giant cookies so they can take up to 20 minutes!


pumpkin cookies
I usually use parchment paper for baking most cookies; helps them keep their shape and easy clean up!


pumpkin cookies


Sunday, September 9, 2012

DIY Faux Patina Finished Filigree Earrings

      Super simple faux blue green patina finished "bronze" filigree earrings

antique style earrings


 I used to do a lot of faux finishes in with my dollhouse miniatures but I never thought to do it on jewelry! You can buy filigree discs from craft stores or "upcycle" old jewelry you already have!  See below for the easy directions.


miniatures, faux finishing ideas
 1:12 scale miniature urn I made from the cap of dish detergent and some fimo clay with a faux patina.


For the earrings, start with  filigree discs; these come in silver, gold, copper and even sometimes a dark antiqued finish, or just use some old pieces of jewelry. If you happen to have dark antiqued filigree you can skip the first two steps!


Step one: (top discs) spray with a primer, I used gray; let dry
Step two: (bottom discs) add a coat of bronze spray paint; let that dry.


faux finishing techniquesfaux finishing techniques

Step 3: Mix up a gray blue green "patina" with some acrylic paint.  I used what I had on hand;  turquoise, dark leaf green, white and brown.  Sometimes you can find a bottle of blue-green faux patina in craft stores. Add a blob of white paint and mix slightly so it looks marbled:

faux finishing techniques


Step 4: Take a slightly damp paper towel, crumple it up and dab some of the mixture onto some paper top get the excess off then blot onto the bronze discs:

faux finishing techniques

faux finish ideas


Last step: Quickly before the paint dries, take another damp paper towel and blot away the paint so some of the bronze shows through:

faux finish ideas
If you want,  you can give these a coat of clear acrylic matte or semi gloss, then add beads and ear wires and you have some cool looking earrings!


shabby chic earrings
These filigree earrings were made from old clip-on earrings with a Shabby Chic finish.


If you don't want to make them yourself,  you can find these antique style earrings in my Etsy shop!