 |
| 1:12 scale miniature "glass" art made with plastic and glass seed beads |
DIY Dollhouse Miniatures: Modern "Glass" Art Tutorial
I am designing a modern dollhouse loft.... or now maybe some miniature shipping container pods... I have been wanting to do some modern minis for years! I started with some of the accessories and furniture first; that was years ago and I haven't done any miniature work since! These "glass" bowls are perfect for a modern dollhouse, plus they are fun to make!I love the look of Dale Chihuly style glass art along with pottery, sculptures and my modern paintings. Someday I will build a lighted glass shelving unit to display my miniature "glass"art.
Materials and tools needed:
Plastic produce containers like those rectangular ones for herbs or spinach
Colored Sharpies
Foil
Scissors
Seed beads
Krylon clear acrylic spray
Super glue
Tacky glue
Toothpick
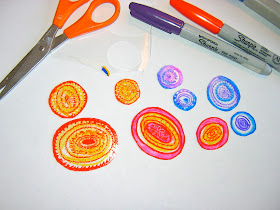
Step one: Cut out ovals or circles of various sizes from plastic produce containers. Using permanent markers draw circular patterns. You can smear patterns with a toothpick or blot with a paper towel; be creative. Note the plastic will shrink a bit.
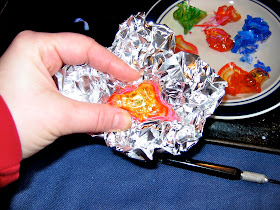
Step two: Place one piece on crinkled foil (the crinkles make it easier to pick up the plastic) and place in preheated 275F oven for 45 seconds to one minute.
Step three: Quickly remove from oven and shape with fingers by cupping the plastic in the foil ( it will be cool enough). If it hardens before you get the desired shape, place back in oven with foil pinched around to hold its shape for about 30 more seconds. You can rework the plastic for a total of about 3 minutes before the plastic will start turning white which creates interesting effects.
Step Four: Touch up with markers if necessary and spray with Krylon Acrylic Gloss. Super glue any pieces together and glue glass seed beads inside using tacky glue.
My other minis: 1:12 scale Antique Shop 1:12 scale Dollhouse Tea Shop 1:12 scale miniature clock and jewelry shop 1:12 scale Conservatory 1:12 scale Victorian Dollhouse Living Room
Dollhouse Bedrooms
Do you love miniatures or have you tried this tutorial? Comments welcomed!


This is absolutely amazing! Wouldn't they make outstanding spring flowery pins for Mothers' Day? Or bulletin board magnets? Great way to recycle. Mahalo for sharing.
ReplyDeleteHawaiianLibrarian, Thanks so much! I've seen cool upcycled plastic necklaces.....never thought of using this method for jewelry LOL! Great idea!!!
DeleteWhat are the plastic produce containers? Can you give me an example? Where do I find those?
ReplyDeleteI get them at the supermarket; my fresh herbs and salads come in rectangular plastic containers...maybe bakery containers could work...here in the US they put everything in plastic!
Deleteyou'll want to look for #6 recyclable plastic.
DeleteClear plastic containers that contain strawberries, blueberries, fresh herbs. Also found in the bakery department with pastries inside.
Deletethank you, I was wondering what would be best
DeleteMy concern would be......is there toxic fumes/smell from the plastic melting ? Reminds me of "Shrinky Dinks" from years ago.
ReplyDeleteMary Ann, Me too! There is no smell unless the oven is too hot & burns so I would make sure the fan is on and windows are open!
Delete
ReplyDeleteA most wonderful tutorial, thank you for sharing. I am anxious to try it right away.
I am your new follower. Do you mind if I show your work on my blog? Giving you full credit, of course.
Hugs, Drora
Drora, Thanks so much! Love it if you used my work on your blog! Let me know when you do so I can tweet it :)
DeleteHi Heather, I followed Dora here. Thank you, for this great tutorial, I will be adding a link to my tutorials list at
ReplyDeletehttp://mslists.blogspot.com/
Thanks a bunch Mary :)
DeleteI, too, followed Drora. What a marvellous tutorial, and what a grand idea. I've been to see the exhibition in Tacoma and walked across "his" bridge plenty of times, when I lived in Pt Townsend. I should come down again sometimes soon :)
ReplyDelete... in "stalker mode", I'm now following you on FB, Pinterest, Twitter... and I "Liked" your page, and pinned this to my tut collection board...
Thanks, Drora for finding this, and thanks, Heather for sharing <3
Kundry's miniworld
Thanks so much K Douglas, I will have to "stalk" you now :)
DeleteAnother Drora fan :D Your work is fantastic. Thank you very much for the tutorial.
ReplyDeleteHugs Maria
Maria, thank-you so much!
DeleteWelcome to my blog, A fairytale come true. Very interesting what you do in glass.
ReplyDeleteThere is so much I want to do, but it takes time to learn new techniques, so it is great to be inspired by your work.
Hugs
Wyrna
Wyrna, thanks so much :)
Deletethis is so cool!i drool over dale chihuly's work,so i can't wait to try this fun,affordable facsimile!i make colorful 'glass/porcelain' bowls that i cut from the 'dimple' in the bottom center of CRUSHABLE plastic water bottles,then paint with nail enamels.miniaturists are the truest recyclers!:) Kat
ReplyDeleteKat, Your bowls sound fabulous! Nail enamels come in so many cool colors; they are very handy:)
Deletei don't have the tech skills yet to know how to post pix,but when i do,i'll show u what i've done with my little bowls.family thought i was nuts,til they saw the results!i see your art glass tut just about everywhere!:)Kat
DeleteThanks Anonymous :)
DeleteI've been using recycled plastic containers for years. So many things to make with the stuff and it's free.
ReplyDeleteThanks Anonymous, so many things to make with plastic containers!
DeleteWhat happens if you don't use foil but use something else that's non-stick and put it in the microwave instead? I don't have use of a conventional oven.
ReplyDeleteRoberta, I have not done this with a microwave, you could try heating in microwave & shape with your hands then maybe dunk in cold water to "set". Let me know if you try this & how long to heat or if it even works. Good luck :)
Deleteit is beautiful tutorial.. very good idea..
ReplyDeletei love your project, thanks for sharing with us.
can u please tell me, what type of plasti can be use ? and can we use plastic bottle/ juice bottle?
thanks.
Thanks so much Asha. I am not sure about plastic bottles, but you could give it a try & let us know how it works!
DeleteThat's just amazing! Thanks for letting me know about this fabulous tutorial! I will link up on my blog post!
ReplyDeleteThanks so much Pearl :)
DeleteHi, Is the set of blue bowls near the top something you made or is that some of Chilhuy's? I love those colors.
ReplyDeleteGrammy, Thanks, those are my mini plastic ones :)
ReplyDeleteI am still confused as to what a plastic produce container is and looks like -- there are so many. Do you mean clear plastic? Is it possible to show a picture of one? I so badly want to do this project with my twin grandchildren.
ReplyDeleteSorry I don't have any photos right now, I've been growing my own herbs but if you look in the produce section (USA!) you will find rectangular containers with fresh herbs in them, some of the bigger salad containers work but some don't, water bottles will work also! Hope this helps :)
ReplyDeleteCan we use clear large plastic bowls instead?
ReplyDeleteNot sure, but you can test a piece of it out. If it shrinks and is firm when it cools it should work; some plastics get floppy and soft. Let me know how it goes!
DeleteMy boys and I did this for an art project this afternoon. Fun and easy "upcycling" project. Thanks!
ReplyDeleteEmily that is so great to hear! Thanks for letting me know :)
DeleteTried berry container and did not work. was plastic. Any tips?
ReplyDeleteIf you can find the herb containers.. those will work or maybe try salad containers. Good luck!
ReplyDeleteYou're so talented!! I love how easy it looks and the detailed instructions.
ReplyDeleteThese are wonderful, and I can't wait to try doing this! I fell in love with Chihuly when at Mayo Clinic in Rochester some years ago. They have an entire corridor featuring his work overhead. His work is amazing! There are a few of his works at a museum about 40 miles from where I live in WV, and I am planning to go there as soon as I can.
ReplyDeleteLook for the triangle with 6 inside it, it reacts like shrinky drink sheets.
ReplyDelete