Monday, December 29, 2014

Wearable Art Jewelry – Wire Wrapped Fabric Necklaces and Earrings

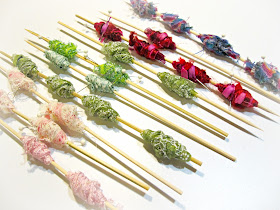
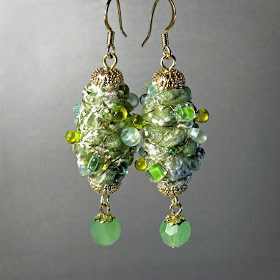
Fabric Art Jewelry Check out my new line of fabric or fiber wearable art jewelry on Etsy!  I make these using scrap fabric, ribbon, lace and even pipe cleaners then wrap with wire and sparkly glass beads!  So colorful and loaded with texture, also lightweight and fun to wear!


Fiber art jewelry heart pendant


Fuzzy blue earrings


Mint green fabric necklace with buttons


To keep up to date with my new designs please like and follow BluKatDesign on facebook.


 I would love to see your comments on my new line of jewelry below!

Friday, December 12, 2014

Simple Repurposed Bulb Fabric Ornaments DIY

repurposed ornaments
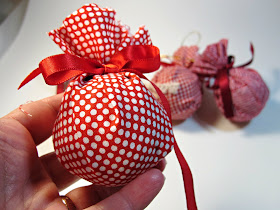
Repurposed bulb ornament with scrap fabric!

Repurpose old and ugly glass or styrofoam  bulb ornaments into something new!  A super easy project using scrap fabric, ribbon and old ornaments.


upcycled ornaments
Upcycle old ornaments


Depending on the size of the bulb, you might start with an 8x8" square piece of scrap fabric. Make sure you have a cord attached for hanging then form the fabric around the bulb and tie a bow!  Carefully trim the excess fabric off without cutting the hanger and you have a super simple upcycled ornament!


easy DIY ornaments
Upcycled fabric ornaments


cristmas crafts


handmade ornaments


Be sure to see my upcycled jar lid photo ornaments and follow my Pinterest board: Christmas Ornament!

Do you upcycle at Christmas? Comments welcomed!

Sunday, December 7, 2014

DIY Upcycled Photo Christmas Ornaments

DIY photo ornaments


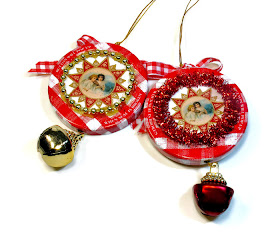
DIY   Christmas Ornaments, holiday crafts made from upcycled jar lids, scrap ribbon and mini metallic Christmas trim with photos of friends and family. You can also find cool free vintage prints online to download or  recycle old Christmas cards!  I especially like the gingham lids from jam. 

Materials:
jar lids
hot glue 
Mod Podge
glitter or fairy dust
various trims, ribbon and cords
bells or something fun to dangle
tiny ornaments
photos or prints

Tools:
glue gun 
drill
scissors

1) Figure out the diameter you want for the photos using a photo editing program ( I used Mac Pages) I made extra in slightly different sizes just in case they didn't work. Leave enough space for any trim (about 1/4" ) print  and cut out the photo so they are circular and will fit in the lids.

2) Drill holes in lids; one on the top and one on the bottom; thread the cord you are going to use to hang them ( I like the stretchy gold ) add the bell then tie an knot on the inside of the lid and hot glue it. Do the same with the hanger, I tie a knot on the outside too.

3) Using Mod Podge, paint the lid on one side and a trick is to let the Mod Podge slightly dry by blowing on it for a minute or two then place your photo on it....this should keep the paper from crinkling and keep it nice and  smooth. Repeat on the other side and do all your other ornaments. I let mine dry about 1/2 hour before putting a coat of Mod Podge over and dusting with glitter or fairy dust.

4) When dry,  you can add the trim, hot gluing it in place and adding other ornaments like a bow.


Here is one I did for Abby,  from the The Vintage Inspired Passionista Blog made from the last pickle jar lid in my house:


Vintage Inspired Passionista


jar lid ornaments
Upcycled ornaments with free vintage printables on the backs


upcycled ornaments


Christmas ornament DIY


These look even better on a tree! Next year maybe I can save enough lids for my own tree!

Do you like upcycling Christmas ornaments, what do you make for Christmas? Comments welcomed!

Friday, October 31, 2014

Time ...on Etsy

Time....

The end of daylight savings time
Steampunk Necklace,  Unique Pendant, Victorian JewelryDude Motel Pop Art Modern Wall Clock, Colorful Home Decor, Vintage Sign, Natural Wood, Black or White Frame ClockAlarm Clock Art Print (Yellow) - Hand PrintedCopper Gear Earrings with blue crazy lace agate antiqued copper gears with pure copper earwires
3D Printed steampunk watch clock cookie cutterGold Celestial Watchgear Steampunk Necklace, celestial steam punk pendant, upcycled, recycled, ooak, one of a kind steampunk jewelryBig Ben Pop Art Photography / London Travel Print / Home Decor / Orange / Blue / Wall Art / Fpoe / Westminster / Clock TowerSome Time is Now, Original Painting on Reclaimed Wood, Hand Lettered Sign on Old Board
Surreal clock painting.Paris Photography, French Wall Art, Paris Decor, Romantic, New Year, New Day, Time, Parisian Clock, Timeless, Fine Art PhotographyThe Iron Man at Sunset, Crosby Beach, Liverpool, UKSleep Sweet pillow cover - 12"x18" - nursery pillow - guest room -master bedroom pillow - linen pillow - wedding gift - anniversary gift
Gear Mold/Mould Trio - Silicone Mold - Steampunk GearsHand stamped book mark 3/8 inch copper or aluminum with your choice of words-symbols great personalized giftSun face pocket watch, men's mechanical pocket watch with sun face mounted on front cover of double open coverCuckoo Clock - printed on vintage page from old dictionary

Powered By Toastie Studio - Etsy Tools

Friday, October 24, 2014

Jewelry Photography - How to Photograph Earrings

photographing earrings


I am no expert on photography and photographing jewelry is not the easiest! Most earrings look best hanging but even though I like to use props like vases or jars to hang them from, they can be distracting for the first photo in my Etsy store. For that shot I like to have my earrings dangling from what seems to be nothing with a plain white background:


handmade earrings


 I finally built a heavy duty earring hanger from shelf brackets, scrap wood and dental floss. I used to have fishing line attached to my Modahaus Table Top Studio  with flimsy coat hangers so the earrings would droop and slide around but with these sturdy brackets and dental floss, I can get the line nice and tight and makes setting us so much easier! ( That's 50% of the shot right?)  Now my next project is to find brighter lights and maybe some sturdier lamps, it seems a lot of photo lighting is made very cheap and breaks almost right away!

Some other tips:

I use two lamps on either side plus a handheld light that I can move to get the light just right.
Besides using iPhoto for editing photos, I will use FotoFuze, a super simple way to get the background truly white then I will run all my photos though iPiccy a free online photo editing program that is fairly simple to use also.  iPiccy helps make my photos more crisp and pop! Even if you don't have any fancy equipment you really need to try these photo editors to get your photos looking their best!

Do you have any photo tips you want to share? Like this article? Please comment below:)

Friday, October 10, 2014

Wire Wrapped Fabric Beads - DIY Jewelry Tutorial

DIY Beads


bead tutorial

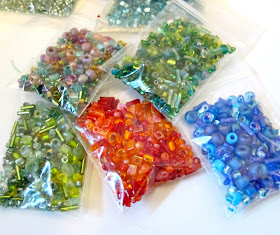
These beautiful wired wrapped fabric and ribbon beads are so fun and simple to make and look like expensive art or glass beads!  They are just made from scraps of fabric, ribbon, yarn  and wire with seed bead assortments I got from Auntie's Beads:

seed bead mixes
Miyuki seed beads mixes in assorted sizes from Auntie's Beads


scrap fabric
Scrap fabric, ribbon and yarn
Supplies:

1) Assorted scrap fabric, ribbon and yarn; look for cool textures with shimmer!
2) Assorted wire in all colors ( I like Artistic wire from Auntie's Beads) from 20 gauge to 28 gauge.
3) Seed Beads, I like Miyuki seed beads mixes in mixed sizes from Auntie's beads.
4) Tacky glue

Tools:

1) Wire cutter
2) Bamboo skewers


Step one:
bead tutorial


Start wrapping your ribbon or fabric strips around a bamboo skewer.  Here I used sheer 2" wide ribbon that has wire in it and is about 9" long. The wired ribbon is very easy to work with because you can mold it to shape.  For fabric,  I use 1" by 6 to 9" strips; it just depends on how thick the fabric is and how big of a bead you want. You can either add more or cut any excess off if necessary. You can use a combination of fabric and ribbon, lace and even wrap yarn!  If you are not using the wired ribbon,  pin your fabric to hold it together:


ribbon beads


fabric bead tutorial


Step Two: When you get the shape you want, take a yard of wire and tie or twist it around the center of the bead. Then add a few seed beads as you wrap the wire around:


how to  make fabric beads


 Keep adding beads and wrapping until there is about 4" of wire left then loop it though a seed bead  near the edge a few times to hold and then I like to coil the rest of the wire around the skewer at the end:

handmade beads
Loop the end of the wire though a bead a few times to hold.

Then repeat, adding beads to the other half of the wire. Sometimes I need to add more wire and beads. You can squish the bead and shape it to make it tighter as you are wrapping. When I am finished I like to remove it carefully from the skewer, sliding onto a head pin or eye pin with a small bead cap,  adding a dab of tacky glue to the ends so it wont unravel.  I have also cut the skewer and left it inside the bead and wrapped the excess sturdy 20 gauge wire around and formed loops to hang. (see purple bead below) You can also start with a paper coffee stirrer straw instead of a skewer and glue your fabric onto that but I didn't want to raid Starbucks just yet!


handmade bead
 I used 20 ga wire and wrapped ends and made loops


art beads


fabric bead dangle earrings
Find my fabric bead jewelry in my Etsy Shop

Be sure to check out my Etsy shop frequently for more fabric bead jewelry or fiber art and even necklaces will be coming soon!

Do you like this tutorial, is this something you could make? Comments welcomed :)


Thursday, October 2, 2014

Simple Hoop Drop Earrings - DIY Jewelry Tutorial


DIY earrings


Simple DIY jewelry tutorial: hoop drop bead dangle earrings even a beginner can make! I had these extra bead caps I got from from The Beadmixer. I wasn't sure what to do with them until I found some large 12mm pearls and Czech glass beads I had in my bead stash. You can find all of the parts you need at The Beadmixer; I've included links to them.


Tools:
Needle nose pliers

Materials:
30mm head pins (about 1 1/4") in bronze
Antique bronze 35 mm hoops
Antique bronze bead caps
12mm beads

Step 1: Take your needle nose pliers and bend the last filigree loop out slightly so the bead will fit just at the end:

earring tutorial


 Step 2:  Add your 12mm bead to the head pin, add the cap, being careful not to scratch your bead.  Bend the pin almost 90º ( I just use my fingers),  holding onto the filigree so the cap will not open and the bead wont slide further into the cap,  take you needle nose pliers and make a loop. Then slide onto the hoop. The 30mm pin should be the perfect length for a loop just big enough to fit onto the hoop.

For more detailed photos on how to make a loop see my previous post:  Jewelry Tutorial for Beginners, there is also a link to helpful videos for beginners.

pearl drop earrings


hoop drop earrings
hoop dangle earrings

Find these and other handmade earrings in my Etsy store.

For more jewelry tutorials follow my Pinerest board: DIY Jewelry Tutorials

Please let me know if you like this tutorial and other comments are welcomed here!


Sunday, September 28, 2014

DIY Earrings - Jewelry Tutorial for Beginners

DIY earrings


DIY Bead Dangle Earrings; Beginner Jewelry Tutorial.
I found these gorgeous floral porcelain beads at The Beadmixer so I just had to get them along with all of the findings to make these great bead dangle earrings.  This tutorial should be easy enough for a beginner plus I have a unique tip for even an advanced jeweler! Sometimes it is difficult to figure out online what size bead cap will really work for certain beads so I have links to most all of the bead caps and items used.


Tools:
Needle nose pliers
Flat nose pliers
Wire cutters
X-acto knife
Sharpie

Materials:
18x14mm oval porcelain beads
Ear wires or hoops of your choice
gold flower bead caps
bead caps 8 mm
8-10mm Czech glass beads  (I had these 10mm tangerine beads already)
1" head pins
2" eye pins
Florist tape


Step 1: Add your  8-10mm  Czech glass bead to your 1" head pin  then add the 8mm bead cap and bend the wire almost 90º : (there are many helpful youtube videos)


DIY earring tutorial

Step 2: Take your needle nose pliers and make a loop, you can cut it off here or continue wrapping the wire around and snip the end. Then take your flat nose pliers and squeeze or bend to make the loop straight :


earring tutorial


Step 3: Take your long 2" eye pin, open it up with your flat nose pliers and add the bead dangle and close the loop and straighten out any bends in the pin with your flat nose pliers:


DIY earrings


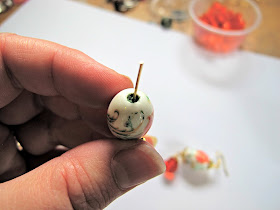
Step 4: Add the larger flower bead cap then the bead and mark the spot where the bead ends:


large hole bead tips

beading tips


Step 5: Remove the bead and take 3" of florist tape (****this is my trick to keep the large hole beads from wobbling and turning!*** ) starting at the mark, wrap the pin with the tape down towards the bead cap. This does not have to be perfect. Then roll the tape between your fingers to make it tighter and smooth. Then slide the bead on, it should be tight but if it is too tight just squish the tape tighter. Make sure no florist tape is sticking out of the bead cap, if it is just slide the tape up. If the bead is still loose you can add a little more tape at the top and push it in with an X-acto blade:


beading tip
Tip: add florist tape to keep large hole beads from wobbling

large bead hole beading tips
Fill hole with florist tape using a point or X-acto

Step 6: Add either another leaf flower cap or the 8mm bead cap then make another loop to hang your ear wire. Open up your ear wire with flat nose pliers and add the earring and close up the ear wire then make sure the loops are all straight. Hold the earring up and turn the bead so the best side is showing in the front. Repeat for the other earring so you have a gorgeous porcelain bead dangle earring set :


bead dangle earrings


https://www.etsy.com/listing/205100209/dangling-bead-earrings-orange-poppy?ref=shop_home_active_3


bead hoop earrings


flower earrings


Similar purple earrings made with antique bronze findings and beads from The Beadmixer:

8mm bronze bead caps
6mm bronze bead caps
8mm Czech glass beads in purple

Be sure to check out the great selection of porcelain beads at The BeadMixer, there are many more colors and shapes to choose from!


Buy all of these floral earrings and more at BluKatDesign on Etsy.

Follow my Pinterest board for more tutorials:  DIY Jewelry Tutorials


Please let me know how your earrings turn out. Comments welcome!